Wednesday, June 13, 2012

LAZY DAISY


Taylor-Smith-Taylor
Lazy Daisy pattern just speaks 
Spring and Summer!


This coffee service has been set up on the sideboard for more than a month.
 I am an extremely busy woman 
or
I am a totally discombobulated old broad!
(No vote necessary)
This pretty set of dishes was manufactured in the 1950s.
The bright white daisies and the soft green color
are a perfect look for this time of year.
The interior of each piece is mocha colored and the lids on the coffee pot and creamer are made of wood with  brass knobs. The design of the knobs is a giveaway to the mid-century origin.
If you take cream in your coffee be careful. You won't be able to see the coffee in your cup.
This adorable Tea Coffee Towel reminds us that the bees are a buzzin'. The silver colored bee is a pot sitter from Cracker Barrel.
The silver is International sterling, Stratford pattern, 
introduced in 1902 and discontinued, some sources say 30s, some say 50s. 

We move to the left side of the sideboard.
Here you will see a pair of ceramic vintage style boots. They are truly vintage because I made them in 1967.
They were a gift to my mother and unfortunately, in time, came back to me. They were matte black with gold eyelets when I gave them to Mom.
I used a pedestal cake plate for lift, added flowers and a snail, pot sitter. The jar of flowers is from the tray of bottles I won from Verbena Cottage.
The Hydrangeas are from my garden. The two colors are from the same bush. I needed small blossoms but they were very hard to find. I think these are really still in the bud stage.
The Daisies are faux as mine are doing poorly.
Sorry, I HAD to have Daisies!
I love the detail in the shoes. At times I forget they are ceramic. The visible creases mimic normal wear.
 Also at this end, the footed server and Gerber Daisy dessert plates await the blueberry scones.
The scones arrived shortly after the shoot. They tasted good but were not photo worthy. That's a story for another day, let's just say "lost keys". We won't discuss how many I ate. Bob insisted on storing his extra (American) biscuit with the scones. 
International Brotherhood!
I removed the bottle of flowers so you could see more detail in the shoes. 
I have always wished I had some shoes like these.
I should have called this post "Ginger Loves Shoes".


I hope you have enjoyed your visit today. If you did please comment, I love to read the sound of your voice.

Join me here:

Monday, June 11, 2012

Worthing Court: Happy One Year Blogoversary and a Giveaway!


Go by and visit with Suzy,  at Worthing Court. This is one talented lady and she is celebrating her first year blogging anniversary with a great giveaway.
You will love her blog.

Worthing Court: Happy One Year Blogoversary and a Giveaway!: Hello all you sweet peeps! I can hardly believe it, but yesterday marked the one year anniversary of Worthing Court!  My oh my, how tim...

Sunday, June 10, 2012

I COPY VERY WELL!

But Mom, Everybody's Doing It!
Well, you might have known,
I jumped off the bridge!
I did what everyone else is doing,
I made a flowerpot wreath.
I had pinned this to  My Pinterest
a couple of months ago,
via Bees Knees Bungalow's photo from
Bachman's 2011 Spring Ideas House.
This was one of the cutest things 
I had seen in the longest time.

It seems to have taken blogland by storm.
Everyone has a slightly different version
therefore making it their own.
When visiting my daughter, Hollie, in Nashville
we decided to make our version.
Our goal was to make it big enough to make a statement without the wreath being too heavy. We used the fourteen inch wreath forms, thinking this would give us plenty of places to wire the pots.
Being from Savannah, we just had to use Spanish Moss. However, I rarely use the moss that is all over my trees. If you want to use fresh moss be sure to spray it first and let it set a day or two. We our supplies came from Hobby Lobby.
We had to get someone to open up the packages of pots, take out the broken ones and combine enough good pots for our project. They were nice about doing that (they couldn't sell the packages with the broken ones).
We used two inch and four inch pots. 
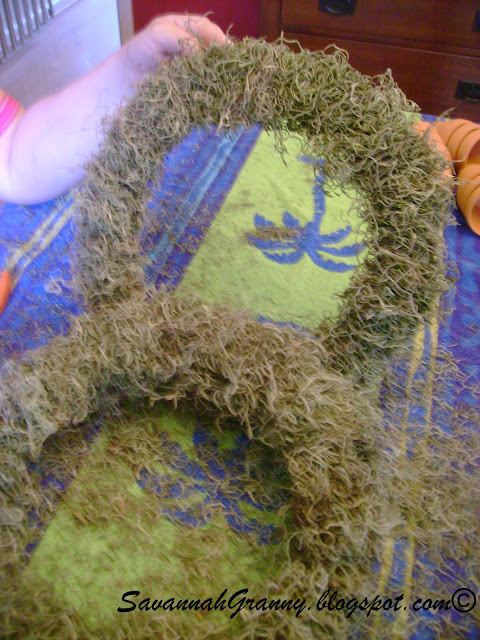
We wrapped the wreaths with the moss. We were generous with the moss as it goes a long way.

We finished wrapping the wreath forms and are ready to wire the pots.
This was the largest wire they had in stock. I would recommend using 22 gauge wire. Remember the higher number the gauge the smaller the wire. I always remind myself,  it sounds bassackwards!
Our flower pots are wired. We wired the larger pots and hot glued the smaller ones. We experimented with different ways to wire. All methods, of course, require going through the hole. 
We did find that we could wire the pots, in a straight forward way, through the hole (from the bottom), out the top and around the wreath.  We would then go in with a second wire, through the hole (from the bottom), loop around the first wire, inside the pot. Bring the second wire back out the hole toward the bottom and wrap/twist both ends around the wreath. This will snug up the pot. You can adjust the position before you tighten the final wire. WHEW!
~~~~~
It was here that we had to part company. Neither of us was sure how we would finish them. We had the hard part done. It was the last day of our visit 
and we did just that, visit.
~~~~~
Meanwhile, back at the ranch, Savannah.
 I found some burlap type ribbon that I had for a long time. I thought it would add to the natural look.
I have never had good luck with herbs and I really didn't want to think about watering these tiny pots in our summer heat. 
So what do I do? I find something blue, faux blue. No it is really blue. I found something blue that was faux. Yep, that's it.
Did I tell you that blue is my favorite color? Four Hundred Sixty Three times? That many?
 I always have blue, faux and stuff around. I found some faux stuff in blue that fit the purpose. 
 I hung the wreath on our screened porch, off the kitchen on one side and the family room on the other.
I think the wreath looks well surrounded by some of Bob's grandfather's tools. The tool at the very top is a curry comb for grooming horses. Directly under the comb is a tobacco punch, used to punch a hole in the ground in which to place the tobacco plant. To the right are sheep shears. Under the wreath is a ladle that we were told was used to melt ammo lead. The hook at the very bottom is a hay hook with a handmade grip.
Yes, that looooong thing is a gourd.
We counted tonight, it is at least forty four years old. It was grown by Bob's dad, in Atlanta. The thing hooked around the bottom is the remnant of a second gourd that had grown around a tree limb but long ago broken. Sigh.


The round gourd was made to be a birdhouse. It is turned around because the birds will tear the screen to get to the gourd. It did happen!
I filled the empty pots with a little moss to cover the wire. After looking at these pics I see more tweaking is in order.
When Hollie sends pictures of her finished wreath I will share with you.
I hope you enjoyed another version of the famed
 "Pot Wreath".

I will be sharing the rest of the porch soon.

I am playing here:
DIY Project Parade
Creative Me

Please leave a comment, I love to read the sound of your voice.

Related Posts Plugin for WordPress, Blogger...